How-To
How to Heat Press Patches: Settings and Tips
By the Nation Patches team · Updated · 6 min read
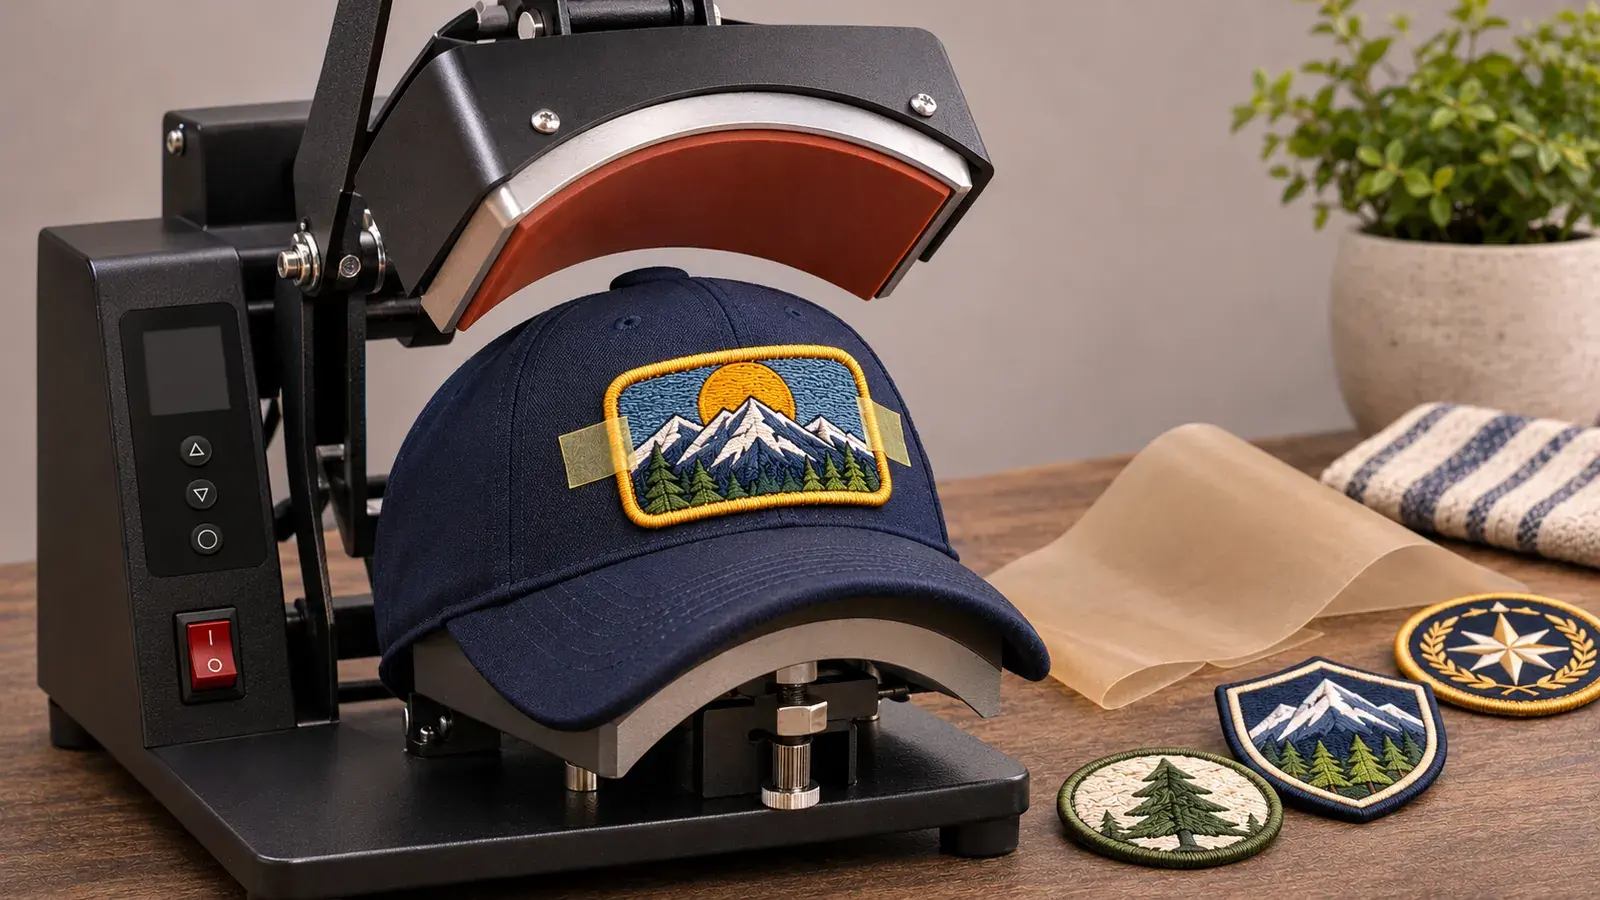
To heat press patches, set the press to about 300–350°F with medium-to-firm pressure. Next, press for 15–25 seconds with a cover sheet on top. Then flip the garment and press the back for another 10–15 seconds. Let it cool before you test the edges.
Those numbers are typical starting points, not fixed rules. Your press, the patch thickness and the garment fabric all change the result. So treat every setting below as a place to begin testing, and always run a sample before a full batch.
Why Use a Heat Press for Patches?
A household iron works for one or two patches. However, its heat drops off at the edges and the pressure depends on your arm. A heat press holds an even temperature across the whole platen and applies the same pressure every time.
As a result, a press gives more consistent bonds, especially on thick embroidered patches. It's also much faster when you're decorating a batch of team shirts, staff uniforms or merch hats. For one-off jobs, our guide to ironing on a patch is all you need.
Which press style fits your work?
| Press style | Best for | Keep in mind |
|---|---|---|
| Clamshell | Shirts, totes and flat items | Opens like a jaw, so thick items get uneven pressure at the back |
| Swing-away | Thick jackets and hoodies | Top platen swings aside, then comes straight down for even pressure |
| Hat press | Structured and unstructured caps | Curved platen matches the crown of the hat |
| Small handheld press | Sleeves, shoes and tight spots | Hard to keep pressure even on large patches |
Many small shops start with a clamshell for shirts and add a hat press later. In contrast, shops doing a lot of outerwear often prefer a swing-away, because the pressure stays even on thick seams.
Heat Press Settings for Patches by Type
The table below shows common starting ranges. Always check the adhesive maker's guidance if you have it, and then fine-tune with a test press.
| Patch type | Temperature | Time (front) | Pressure | Notes |
|---|---|---|---|---|
| Embroidered | 300–350°F | 15–25 sec | Medium to firm | Add a 10–15 sec back press for dense stitching |
| Woven | 300–330°F | 12–20 sec | Medium | Thin, so heat reaches the glue quickly |
| Sublimated / printed | 300–330°F | 12–20 sec | Medium | Too much heat can dull the print |
| Chenille | 300–325°F | 15–20 sec | Light to medium | Heavy pressure crushes the loops; favor the back press |
| Leather | 275–300°F | 10–15 sec | Medium | Use a cover sheet; high heat can darken or curl hide |
| PVC | Not recommended | N/A | N/A | Heat can soften and warp PVC; sew or use hook-and-loop |
Adjust for the garment fabric
Cotton, denim and canvas handle the top of these ranges well. Polyester needs the lower end, because high heat can leave shiny platen marks. Also, dyed polyester can bleed color into a light patch at high heat, which is called dye migration. Nylon is the trickiest, so test at the lowest setting or sew instead.
How to Heat Press Patches Step by Step
- 01
Preheat and check
Set your temperature and let the press fully heat up. If possible, verify the platen with a surface thermometer, since dials can drift.
- 02
Pre-press the garment
Press the blank garment for 3–5 seconds. This removes moisture and flattens wrinkles that block contact.
- 03
Position the patch
Place the patch adhesive side down. Use heat-resistant tape to hold it, especially when you're working on hats.
- 04
Add a cover sheet
Lay a non-stick cover sheet or parchment paper on top. It protects thread and leather from direct contact.
- 05
Press the front
Close the press and run your timer. Don't open it early, because the glue needs the full time to flow.
- 06
Press the back
Turn the garment inside out and press the back of the patch area. This step melts the adhesive right at the fabric.
- 07
Cool, then test
Let the patch cool completely. Then test the edges gently with a fingernail.
Seams, zippers and pockets near the patch can stop the platen from making full contact. In that case, place a heat press pillow or folded towel inside the garment to lift the print area.
Heat Press Patches for Hats
Hats need their own approach because the crown is curved. A hat press uses a curved heating element and a matching lower platen. This shape wraps heat evenly around the patch instead of pressing only its center.
Structured vs. unstructured caps
Structured caps have stiff buckram behind the front panels. They hold their shape on the platen, so they're the easiest to press. Unstructured caps are soft and floppy. For those, slide a firm hat form or pillow inside to create a solid surface.
Typical hat press starting points
- Temperature: around 300–330°F for embroidered and woven hat patches.
- Time: 15–20 seconds. For wide patches, press in overlapping sections.
- Pressure: light to medium, because too much can crease the crown.
- Foam-front trucker hats: use the low end of the range and short presses, since foam can melt.
Hat patches are often sized to fit the front crown panels. If you're stocking caps for a brand or event, custom hat patches can be ordered with heat-seal backing ready for your press. Leather hat patches work too, as long as you keep the temperature low.
Troubleshooting Heat Press Problems
| Problem | Likely cause | What to try |
|---|---|---|
| Edges lift after cooling | Low pressure at the edges or a thick border | Increase pressure slightly and add a back press |
| Patch peels off in one piece | Temperature too low or time too short | Raise heat 10–15°F or add 5 seconds, then retest |
| Shiny box marks on the garment | Too much heat or pressure on polyester | Lower the heat and use a cover sheet or pressing pad |
| Thread looks flat or glossy | Pressure too high or no cover sheet | Reduce pressure and always use a cover sheet |
| Color bleeds into the patch | Dye migration from polyester | Lower the temperature and shorten the press |
| Patch shifted during pressing | No tape, or the press closed too fast | Tape the patch and close the press smoothly |
Change only one setting at a time. Otherwise, you won't know which change fixed the problem. Next, write down the settings that work for each garment, so the next batch goes faster.
Tips for Pressing Patches in Bulk
- Press two or three test pieces first, then wash one to confirm the bond.
- Use a lint roller on each garment, since lint and dust weaken the bond.
- Mark a placement guide on the lower platen with heat-resistant tape.
- Let each piece cool flat on a rack before stacking.
- Keep the cover sheet clean, because old adhesive can transfer to the next garment.
Consistent patches make consistent pressing easier. When backing thickness and patch size stay the same across an order, your settings stay the same too. For a uniform or merch run, custom iron-on patches give you that consistency. Tell us about your garments and request a quote.
Frequently Asked Questions
What temperature should I heat press patches at?
Most heat-seal patches bond well between 300°F and 350°F. Start in the middle, run a test piece, and adjust in small steps for your press and fabric.
Can I heat press a patch with no adhesive backing?
Not on its own. Add a sheet of fusible adhesive web to the back first, or sew the patch on instead.
Can you heat press PVC patches?
It's not recommended. Heat can soften or warp PVC before the adhesive bonds. PVC patches are usually sewn through their edge channel or attached with hook-and-loop backing.
Do I need a special press for hat patches?
A hat press with a curved platen gives the best results on caps. A flat press can work on unstructured hats with a firm insert, but it's harder to get even contact.